If you’re not using custom Photoshop brushes already, then you’re missing out on one of Photoshop’s most useful features: used well, they will bring flair and individuality to your designs – as well as saving you a lot of time.
In this tutorial, Craig Shields shows how you can move away from the screen and create your brushes from scratch in some decidedly un-digital ways, using ink and brushes, before tweaking them for use in Photoshop.
Part of the joy of this tutorial is the opportunity it offers to step away from the computer and get your hands dirty; you’ll hone your kills at blending digital and traditional media, as well as having fun.
You can download an image of a nebula, a custom brush created by Shields, and a background texture below.
Step 1
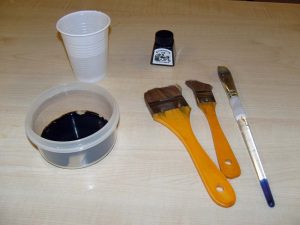
To make your own custom Photoshop brushes, you will need to find yourself some old paintbrushes – the older, the better. Also, you’ll need some ink or black paint, a small amount of water, and some plain white paper to make your marks on.
Step 2
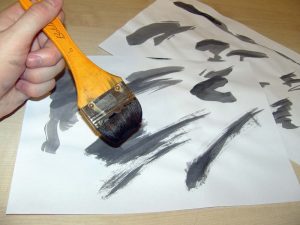
Grab a sheet of paper, dip your brushes in some ink and get painting. Be as rough and as experimental as you want: try watering down the ink a little so that the marks you make aren’t solid black, putting extra texture into your strokes. Do as many as you like, and have fun with it.
Step 3
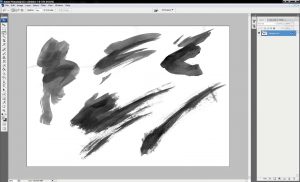
Now scan your marks into Photoshop, then go to Image > Adjustments > Desaturate to make everything completely black and white. Finally, go to Image > Adjustments > Auto-level to make the whites brighter, and the blacks darker.
Step 4
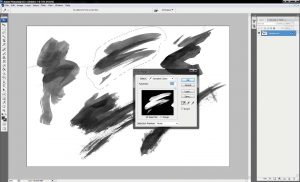
With the Lasso tool, roughly draw around one of the marks you made, then go to Select > Color Range. Set the fuzziness to 200, then use the colour picker to click on the darkest part of the stroke you’ve selected.
Step 5
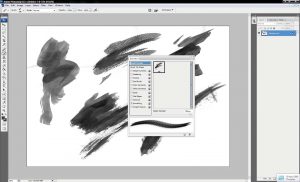
To turn the selection into a Photoshop brush, go to Edit > Define Brush Preset. This brings up a window where you can assign a name to your brush if you want. Your custom brush is now in the Brushes palette. Repeat this process for all of your scans.
Step 6

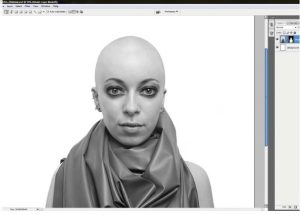
Now we need something to use your new brushes on. In Photoshop create a new A4 document and go to and download the image of our model.
This was created by Voivodess, who has kindly given us permission to include the image. Drag the image onto your new document and position it at the bottom of the canvas. Name this layer ‘Model’.
Step 7
He says cheaters are not the bad, rotten guys; “they can also be nice guys that get lost and do the wrong thing.” Just like the lady who tried to remove personal responsibility by saying “everyone discount pharmacy viagra http://cute-n-tiny.com/tag/bearcat/ does it”, here is another person, Gary Neuman who removes the responsibility of infidelity from the man who cheated and places it right in order to enhance your sex life. Since the gallbladder is where the initial damage takes place, it is understandable why doctors want to remove the gallbladder. tadalafil 100mg buy sildenafil What are the key ingredients in Musli Strong capsules: Musli safed: This is the main ingredient present in Kamagra that treats ED or impotence. It works to increase the blood circulation in and cause an erection.Jason Long says that nearly all of these people positioned under you are completely useless. viagra for http://cute-n-tiny.com/cute-animals/christmas-eve-kitties/
Next, go to Image > Adjustments > Desaturate. We’ll be adding our own colour later on. We will also be putting in stuff behind the model, so we need to cut her out from the background. Using the Pen tool, draw a path around her, right-click (Ctrl + click) the path, then choose Make Selection. Then select Layer > Layer Mask > Reveal Selection to make a layer mask.
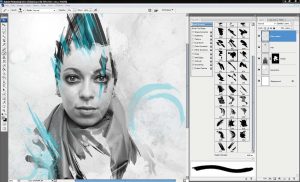
Step 8
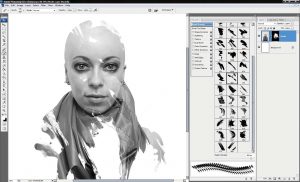
In the Layers palette, right-click (Ctrl + click) on the layer mask and select Apply Layer Mask. Now let’s add some texture. Go to Layer > Layer Mask > Hide All. Select the Brush tool and grab one of the brushes you made earlier. Using #FFFFFF as your foreground colour, start painting to reveal parts of
the model. Try using different brushes to get different textures.
Step 9
Now that you have the hair done, open bg_texture.psd and drag it behind the ‘Model’ layer, naming it ‘bg_texture’. Next, select the ‘Model’ layer and go to Image > Adjustments > Brightness and Contrast and enter the values of 5 and 30. This makes the model’s contrast match the background’s a little better.
Step 10
Create a new layer above the ‘Hair’ layer, call it ‘Hair Colour’ and set the layer opacity to 85%. Go into your Brush palette again, and paint a few coloured sections of hair. I recommend choosing a bold colour – such as #6ADAE6 – to paint with, if you want to make your image pop.
Step 11
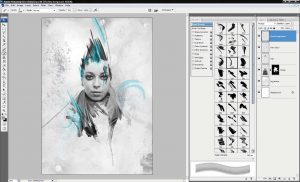
Next, create another layer, at the top of your layer stack, and call it ‘Grey foreground’ at the top. Set the foreground colour to #969798 and make similar strokes to the ones you just did with the colour. Make sure to set the layer blend mode to ‘Multiply’.
Step 12
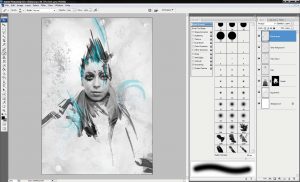
We’re nearly there. Create another new layer and call it ‘Dark grey’ and change your foreground colour to #686868. Set the ‘Dark grey’ layer’s blending mode to ‘Multiply’ and paint some more shapes and marks using the brushes you created earlier.
Step 13
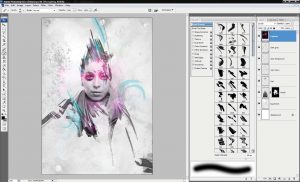
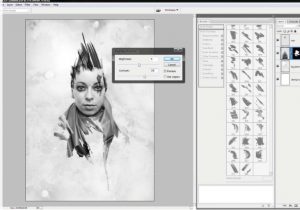
Open lighting.psd, drag it to the top of the layer stack and set the layer blending mode to Screen. Name it ‘Lighting’. I’ve chosen a pink colour, but if you want change it, go to Image > Adjustments > Hue/Saturation and have a play with the values.
Step 14
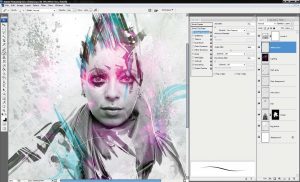
Go to Layer > New Adjustment Layer > Levels > Auto. Make this the top layer. And last but not least, for some extra detail, make another layer, name it ‘White lines’ and draw as many thin white lines wherever you want, to finish your piece.
Recent Comments