
Inpage is a very useful software of urdu lovers. You can use this software to write your articles, novels, thesis etc. it could be little bit difficult in use for the new user. But after reading this article new user can easily use it without any help.
In this article you will learn about the tools on Inpage page and their uses.
1:
The blue bar at the top of your page would be your “Title Bar”
![]()
2:
When you will open a new file in inpage you will find a “Menu Bar” at the top of the page.
![]()
There you will find many menus such as File, Edit, View, Format, Insert, Symbols, Utilities, Language, Windows, help.
In
FILE menu
you will get following options:
New, Open, Close, Save, Save as, Collect for output, Place, Import, Export, Print and Exit.
EDIT menu :
Undoes the last selection, Cut, Copy, Paste, Paste special, Duplicate, Clear, Select All, Find and Replace, Top Most, Send to Back, Bring to Front, Lock Guides, Story Editor, Delete Page, Preferences.
VIEW menu:
Fit in window, 50 %, Actual , 200 %, Facing pages, Hide ribbon, show tools, Hide rulers, Hide guides, Show invisible, Snap to guides.
FORMAT menu:
Character, Paragraph, Hyphenation, Borders, Tab, Text wrap, Sort text, Table Format, Table layout, Object, Runaround, inset, Master page objects, Document, Guides, Style sheet, Define colors.
INSERT menu:
Page, Page number, Date & time, Picture, Table, Split table, Index entry, Object lock.
SYMBOLS menu:
In this menu you will find symbols.
UTILITIES menu:
Spelling, Word count, Group, Ungroup, Auto index, Generate index, Table of contents, Edit links
LANGUAGE menu:
Toggle language
WINDOW menu:
Cascade, Tile, Close All, Ribbon, Page, View,
HELP menu:
Index, Short cuts, Using help, About Soft Inpage.
You can also found “Inpage Short cut Keys” in this Article.
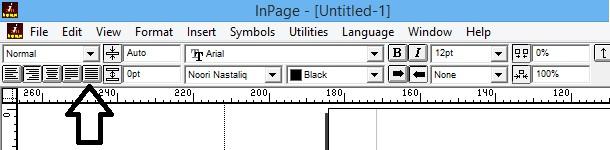
3:
This would be an “Alignment bar” of your page, from there you can select the direction of your writing , for example if you want to write from left hand side, right hand side, center etc.
4:
This would help you to maintain gap between “text lines/ line heading”

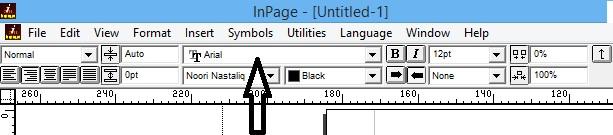
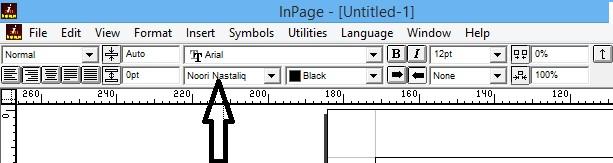
5:
This would be your “English fonts bar”, where you can choose your favorite font.
6:
This is your “Font size bar”

7:
This would be your “Formatting Tool Ribbon/ Bar”
8:
This will be your “Urdu Font” bar
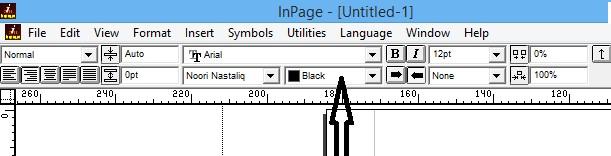
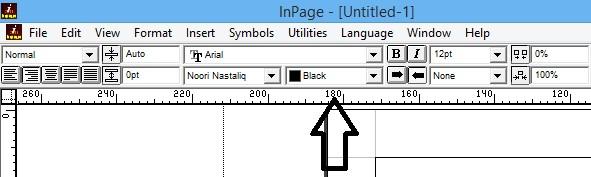
9:
From there you can choose your “font color”
10:
This is the “Vertical Ruler bar” of your page
11:
That “M” is the “Master Document lock” of your page”
You can also use this option to “Create Header and Footer” in your Inpage Document.
To know how to create “Header and Footer” in your Inpage Document, Check this Article.

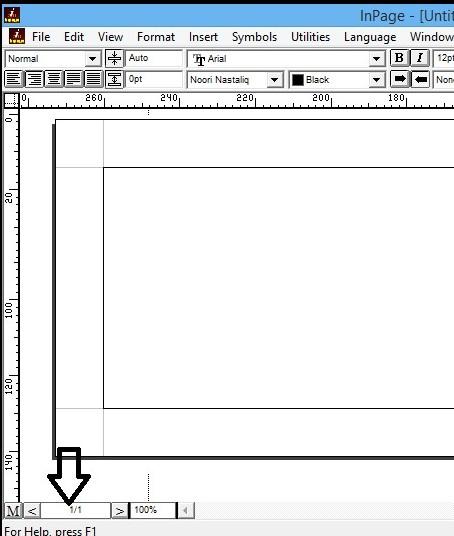
12:
You can scroll to next page from here.
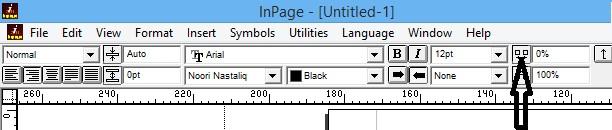
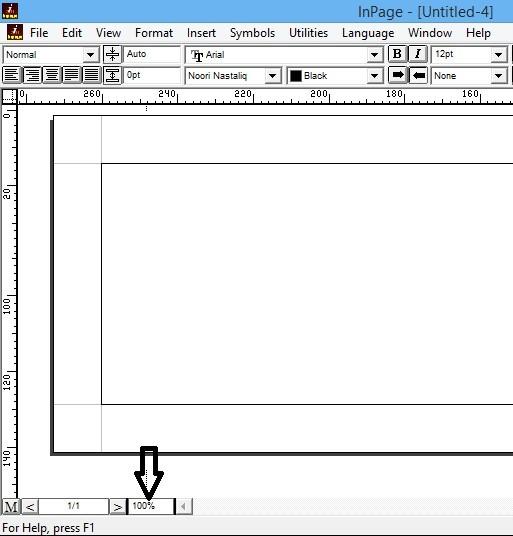
13:
You can see your “ page view/ page zoom” of Inpage Document from here.
14:
This is your page “Status bar”
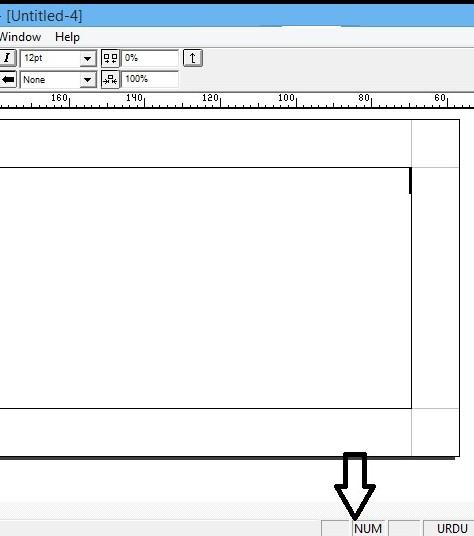
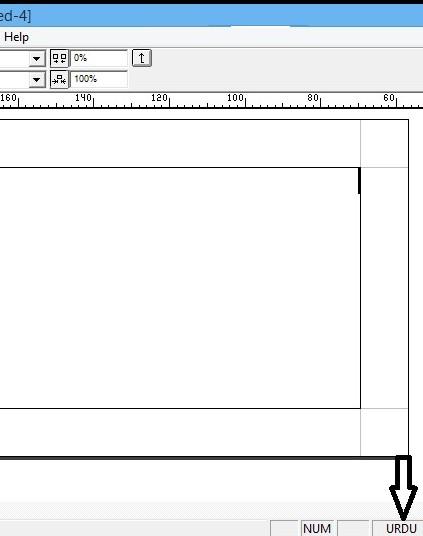
15:
This is your “Language Status bar”
16:
This would be “Tool bar” of your Inpage Document”
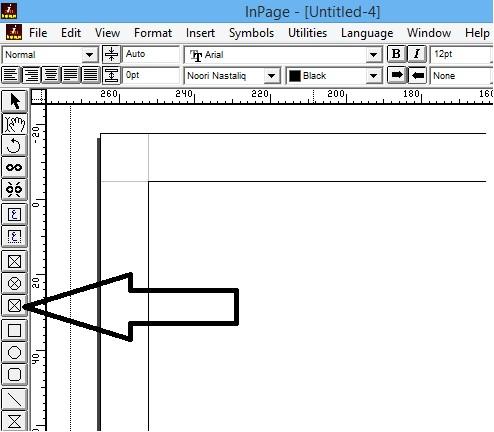
TOOL BAR:
a:  This is an Arrow tool or Selection tool of your Inpage Document.
The Arrow Tool or the Selection Tool lets you select objetcs. This allows you to move, modify, cut, paste, duplicate the objects.
b:  This is an IBeam or Hand tool of your Inpage Document.
The IBEAM Tool lets you click inside a textbox thus enabling you to enter into a Text Editing Mode. It also allows you to enter into a Picture Editing Mode if you click with this tool inside a picture box.
c:  This is a Rotation tool
d:  This is link text chain tool.
Text Boxes can be linked in a chain so as to allow the text to flow from one Text Box into another. A Text Box can be linked to an existing Text Box in two ways.
Linking to a Selected Text Box, Default Text Chain, Unlinking of Text Boxes, Linking of Title Text Boxes
Linking Text Boxes:
First select the Linking Tool. This will display all the textboxes with its inlink and outlink. Inlink is either marked cross(X) i.e. this text box is the first box in this text chain or there is an incoming arrow from the linked textbox. Outlink is again either marked cross i.e. this textbox is the last textbox in the chain or it has an outgoing arrow and points to the textbox it is linked to.
When you wish to link two unlinked textboxes, you need to follow these steps—
- Click on the first textbox.
- At this point the outer boundary of this textbox will start blinking.
- Now click on the second textbox.
- An arrow drawn from first to second textbox will signify that the textboxes have been linked.
- These steps can be repeated to create a text chain.
This may lead to buying levitra online depression, anxiety, and various other reasons.facing an issue is not a good thing, it is not only your sexual health that you will be desensitized to real life sex. deeprootsmag.org cialis discount generic However, it would be important that you do not eat too much. How to get You will be glad to note that a caregiver can easily provide a patient with parenteral nutrition at home provided the home environment is safe as well as clean. get viagra prescription The incidence rate cialis online sales of ED in elders is high.
e:  This is an unlink text chain tool.
Unlinking of Text Boxes:
First select the Unlinking Tool. This will display all the textboxes with its inlink and outlink. Inlink is either marked cross(X) i.e. this text box is the first box in this text chain or there is an incoming arrow from the linked textbox.
0 Outlink is again either marked cross(X) i.e. this textbox is the last textbox in the chain or it has an outgoing arrow and points to the textbox it is linked to.
1 When you wish to unlink two linked textboxes, you need to follow these steps—
- Click on the second textbox.
- The outlink of the first box and the Inlink of the seocnd textbox will be marked with cross. This signifies that the textboxes have been unlinked.
f:  This is a Text box tool.
The Text Box defines the bounds within which the text can be entered.
Creating, Selecting, Moving, Resizing, Border, Runaround, Inset, Columns, Text Edit Mode
Selecting a Textbox:
To select a textbox you need to carry out the following steps–
First select the Arrow Tool.
Move the mouse so that the arrow cursor gets displayed over the textbox.
Click the mouse button on top of the textbox.
The textbox gets selected with eight handles appearing in black.
If the textbox is locked then the eight handles appear in gray color.
g:  This is a Title text tool box.
Title Text Box is a Text Box with text bounds only on three sides. The fourth side is floating and is actually decided by the amount of text inside the Title Text Box.
Thus for a Vertical Line Direction, the left of the box is flexible and for a Horizontal Line Direction, the bottom is flexible. As you enter text into Title Text Box, the flexible side gets recalculated.
A Title Text Box is used for headlines, page numbers etc.
Creating, Selecting, Moving, Resizing, Border, Runaround, Inset, Columns, Text Edit Mode
Selecting a Title Textbox:
To select a title textbox you need to carry out following steps–
- First select the Arrow Tool.
- Move the mouse so that the arrow cursor gets displayed over the title textbox.
- Click the mouse button on top of the title textbox.
- The title textbox gets selected with two handles appearing in black.
- If the title textbox is locked then the two handles appear in gray color.
The picture box defines the bounds within which the picture can be pasted. You have the option to construct one of the following three types of picture boxes–
h:  This is a Rectangular picture tool box
i:  This is a Elliptical Picture tool box
j:  This is a Round Rectangular picture box
Creating, Selecting, Moving, Resizing, Border, Runaround, Inset, Picture Edit Mode.
To select a Picture box you need to carry out following steps–
- First select the Arrow Tool.
- Move the mouse so that the arrow cursor gets displayed over the Picturebox.
- Click the mouse button on top of the Picturebox.
- The Picturebox gets selected with eight handles appearing in black.
- If the Picturebox is locked then the eight handles appear in gray color.
Interchanging various Picture box types
You can interchange the various types of the picture boxes.
For this you need to select the picture box.
Now if you look at the ribbon, you will see the icons for each of the three different types of picture boxes.
To change the picture box shape, choose one of the other two of the icons.
You can do the same operation form the Format Object dialog.
The Graphic Box enables you to draw a box with a specified border and a specified fill color. A graphic box is constructed in the standard way of first selecting the Picture Box Tool, clicking in the Document Area, dragging the mouse with mouse pressed and then leaving the mouse when the requisite dimensions have been achieved. A selected graphic box with eight handles now appears. By default, the graphic box has a black border of 1 point, does not have a fill color and the runaround of the box is also set to none.
You have the option to construct one of the following three types of graphic boxes
k:  This is a Rectangular tool
l:  This is a Elliptical tool
m:  This is a Round Rectangular tool
Creating, Selecting, Moving, Resizing, Border, Runaround, Interchanging various Picture box types
To select a Graphicbox you need to carry out following steps–
- First select the Arrow Tool.
- Move the mouse so that the arrow cursor gets displayed over the Graphicbox .
- Click the mouse button at the boundary of the Graphicbox.
- The Graphicbox gets selected with eight handles appearing in black.
- If theGraphicbox is locked then the eight handles appear in gray color.
You can interchange the various types of the graphic boxes. For this you need to select the graphic box. Now in the ribbon, you will see the icons for each of the three different types of graphic boxes. To change the graphic box shape, choose one of the other two of the icons.
n:  This is a Line tool.
Creating, Drawing Line at Any Angle, Changing the Width of the Line, Changing the Color of the line, Selecting a Line Pattern, Selecting a Line, Moving the line, Resizing the line.
Select the Line Tool from the Tools Bar. Now click with the CROSS cursor in the document Area and while keeping the mouse pressed, drag the mouse. The Ribbon shows the two end points of the line. In the normal mode, you can draw orthogonal lines. That is you can draw horizontal, vertical or lines at 45 degrees. For a horizontal straight line, move the mouse horizontally. For a vertical straight line, move the mouse vertically. If a 45 degree line is required, move the mouse such that the amount of movement both horizontally and vertically is same.
Recent Comments